Intro
This documents the build process for allowing MAME to run in your web browser. This is the process I use to allow all of the SC-3000 tape games I dump to work on this site.
This page was last updated September 2020. The projects listed within have all undergone considerable change since then, and I plan to update this guide "one day".
I don't write any of these tools, but very loudly express my appreciation for all everybody involved in their development, documentation and constant improvement. These include the individuals behind the tools such as:
- MAME - https://github.com/mamedev/mame
- Emularity - https://github.com/db48x/emularity
And the incredible people who run, maintain and contribute to Archive.org.
All of these build guides assume you are running a Linux based operating system with the "APT" package manager (Debian, Ubuntu, Mint, etc). All of these tools will likely build on Windows, but I don't use that, so I'll document what I know works. All of the tools on this site were built in Ubuntu 20.04 LTS.
The upstream documentation is available here: https://docs.mamedev.org/initialsetup/compilingmame.html#emscripten-javascript-and-html
Building the components
Prerequisites
Install the necessary tools provided by your Linux distribution. As above, these are specific to Debian/Ubuntu/Mint style distributions that use the "APT" package manager. Similar tools will probably work in Fedora/CentOS/RedHat style "RPM" distros, but I'll leave that to the reader to discover.
This build is designed to run in a browser. You'll need a web server to serve it from. I won't document that here, but you don't need anything more complex than a vanilla Apache/Lighttpd/IIS style web server that can deliver HTML.
You will need both "deb" and "dev-src" items in your /etc/apt/sources.list file to ensure the "build-dep" command succeeds.
sudo apt-get install -y gcc g++ make automake build-essential clang default-jre wget curl
sudo apt-get build-dep -y mame
It's worth making yourself a directory to store all of these tools in. A "src" directory inside your home directory is a fantastic idea.
mkdir ~/src
cd ~/src
emsdk
This is the ECMAscript (JavaScript) build wrapper that will help us build the in-browser version of MAME.
Clone the git repo:
git clone https://github.com/emscripten-core/emsdk.git
cd emsdk
Install the specific version of the SDK. "Latest" installs 2.0.0 and above builds, however these don't appear to work with MAME. I've tested and use the following successfully:
./emsdk install 1.38.45 Activate the version installed. You'll need to repeat this if you open a new shell or want to build again at a later date
./emsdk activate 1.38.45
source emsdk_env.sh
cd..
MAME
I've successfully built this using MAME 0.217. Changes in later versions fail the ECMAscript build process, but I will update the guide if that changes.
wget https://github.com/mamedev/mame/archive/mame0217.tar.gz
tar xvzf mame0217.tar.gz
cd mame-mame0217
emmake make SUBTARGET=sc3000 SOURCES=src/mame/drivers/sg1000.cpp,src/lib/formats/sc3000_bit.cpp -j8
As per the official MAME documentation linked above, we're going to build a smaller version of MAME. The full MAME build is enormous, but we want to shrink this down to just our target system (in this case, the Sega SC-3000). The "-j8" flag allows the build system to use up to 8 threads. Substitute to match your own CPU.
The build can take a number of minutes or more depending on your hardware. Once built, you should have two files:
- mamesc3000.js
- mamesc3000.wasm
We'll need both, but first we'll need the launcher installed.
Initial Emularity setup
Emularity is the HTML template and Javascript launchers that pass arguments and options to the compiled emulator we built in the previous step. For this to work you'll need a web server of some description (Apache or Lighttpd are two excellent options, but there are plenty more). Typically these put their "htmlroot" in /var/www or /var/www/html, depending on your distro. As above, I use Ubuntu 20.04, so I'll document that process. For other distros, please refer to distro-specific documentation and tools.
sudo apt-get install -y apache2
cd /var/www/html
Next we'll grab Emularity from their GitHub repository:
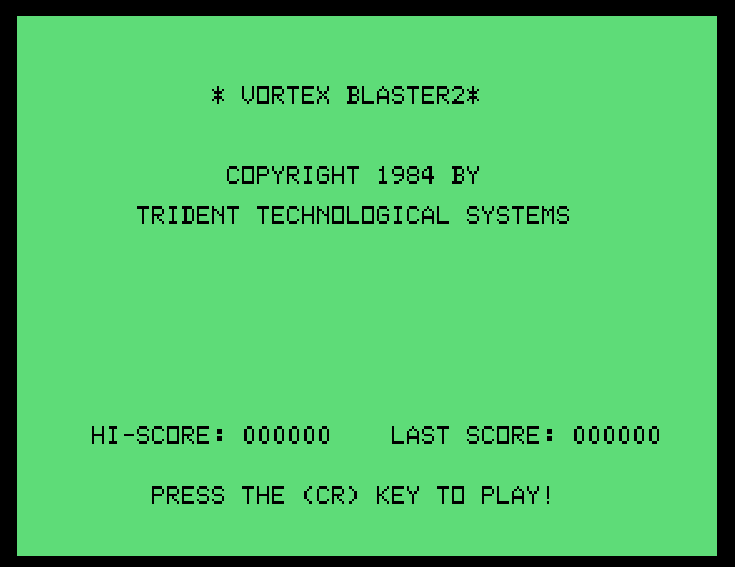
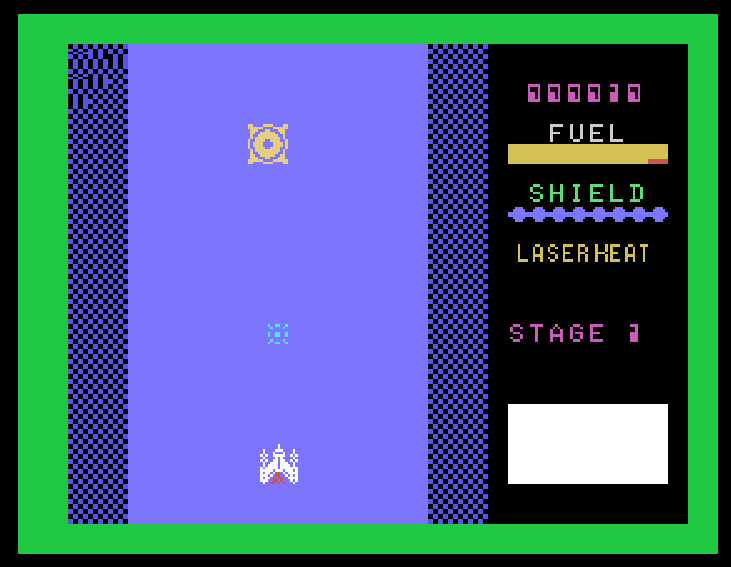
git clone https://github.com/db48x/emularity.gitThere are a collection of excellent example HTML files within the repo demonstrating all sorts of computer, arcade and console configurations. We'll be sticking with the Sega SC-3000 examples here. Using my favourite SC-3000 game "Vortex Blaster", here's the initial setup. Name this file whatever you like, with the .html file extension.
<html>
  <head>
    <meta http-equiv="Content-Type" content="text/html; charset=utf-8">
    <title>Sega SC-3000 Vortex Blaster</title>
  </head>
    <canvas id="canvas" style="width: 50%; height: 50%; display: block; margin: 0 auto;"/>
    <script type="text/javascript" src="es6-promise.js"></script>
    <script type="text/javascript" src="browserfs.min.js"></script>
    <script type="text/javascript" src="loader.js"></script>
    <script type="text/javascript">
      var emulator = new Emulator(document.querySelector("#canvas"),
        null,
          // set the sc3000 driver in MAME
          new JSMESSLoader(JSMESSLoader.driver("sc3000"),
            // resolution is 2x
            JSMESSLoader.nativeResolution(560, 432),
            JSMESSLoader.scale(1),
            // our compiled MAME .js and .wasm files
            JSMESSLoader.emulatorJS("binaries/mamesc3000.js"),
            // MAME-provided sc3000 BIOS
            JSMESSLoader.mountFile("sc3000.zip",
              JSMESSLoader.fetchFile("Bios","binaries/sc3000.zip")),
            // Sega BASIC cartridge image
            JSMESSLoader.mountFile("Sega_BASIC_Level_3_V1_SC-3000.zip",
              JSMESSLoader.fetchFile("Game File","binaries/Sega_BASIC_Level_3_V1_SC-3000.zip")),
            // game tape dump was uncompressed .wav
            JSMESSLoader.mountFile("sc3000_vortex_blaster.wav",
              JSMESSLoader.fetchFile("Tape Image","binaries/sc3000_vortex_blaster.wav")),
            // set the virtual cassette
            JSMESSLoader.peripheral("cass","sc3000_vortex_blaster.wav"),
            // set the virtual cartridge
            JSMESSLoader.peripheral("cart","Sega_BASIC_Level_3_V1_SC-3000.zip"),
            // ensure the TAB key works for tape control and set save state locations
            // runtime options, including UI keys and save state location
            JSMESSLoader.extraArgs(["ui_active", "-state_directory", "/emulator", "-statename", ".", ]),
            ))
      emulator.start({ waitAfterDownloading: true });
    </script>
  </body>
</html>
You can see in the code that all the custom binary stuff we need will go in a "binaries" directory, so make that:
mkdir binariesAnd then copy everything you need in there. You will need:
- mamesc3000.js (compiled in section "MAME" above)
- mamesc3000.wasm (again, compiled in section "MAME" above)
- sc3000.zip (the BIOS file for the SC-3000 computer. Grab it from archive.org or mirrored here and leave it compressed)
- Sega_BASIC_Level_3_V1_SC-3000.zip (Sega BASIC cartridge, mirrored here and leave it compressed)
- sc3000_vortex_blaster.wav (cassette tape data as an audio file, mirrored here, which you will need to unzip)
Create and capture a save state
Normally it's far easier to do this on a desktop build of MAME, however I've been unable to get C++ builds of MAME sharing save states with ECMAscript builds. Hence why I'm going to the trouble of doing all of this in-browser below. I have an open issue with MAMEDev on the matter, which is waiting on me to submit data samples. If the cross-platform issue ever changes, I'll update this guide accordingly.
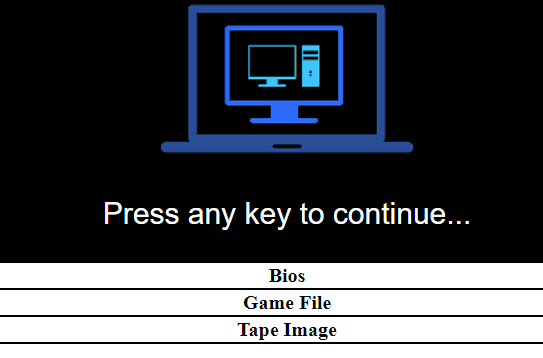
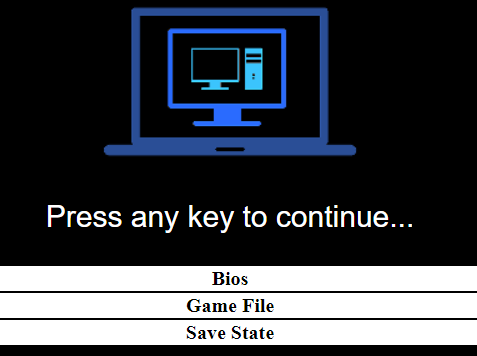
Point to your web server in a desktop web browser that includes a Javascript developer console (I've used Google Chrome in this example), and the Emularity wrapper will begin downloading the assets needed to launch the game. When done, it will prompt you to press a key to continue.
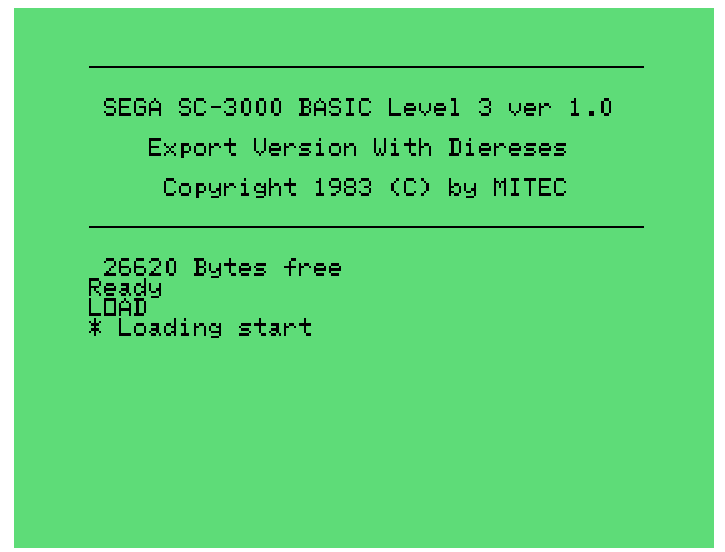
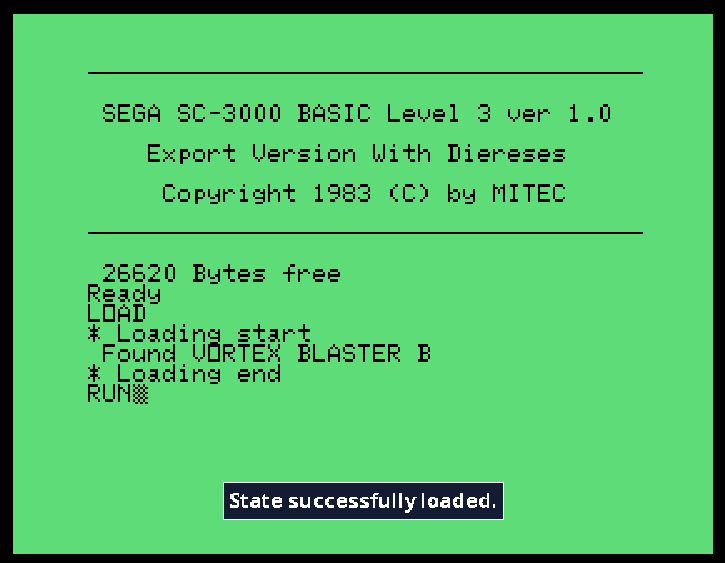
The Sega SC-3000 BIOS cartridge will load, and you'll be presented with the boot screen and black-on-green BASIC command line interface. Type the command
LOAD
And press enter. The system will give you back the message * Loading start
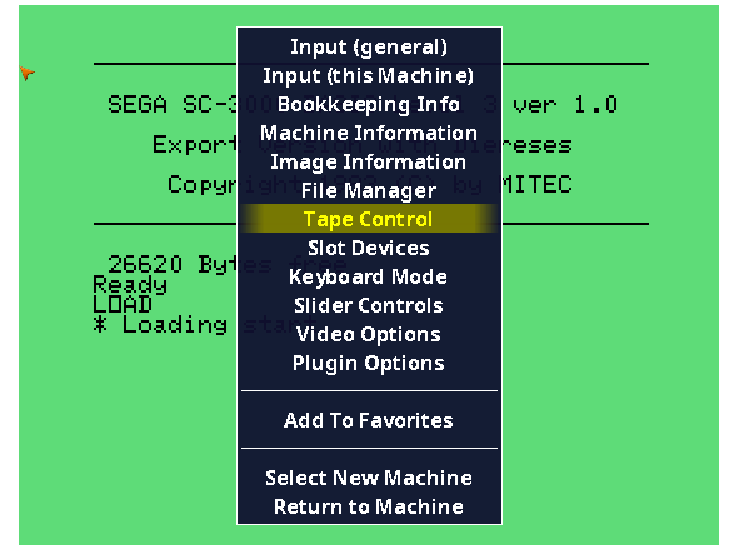
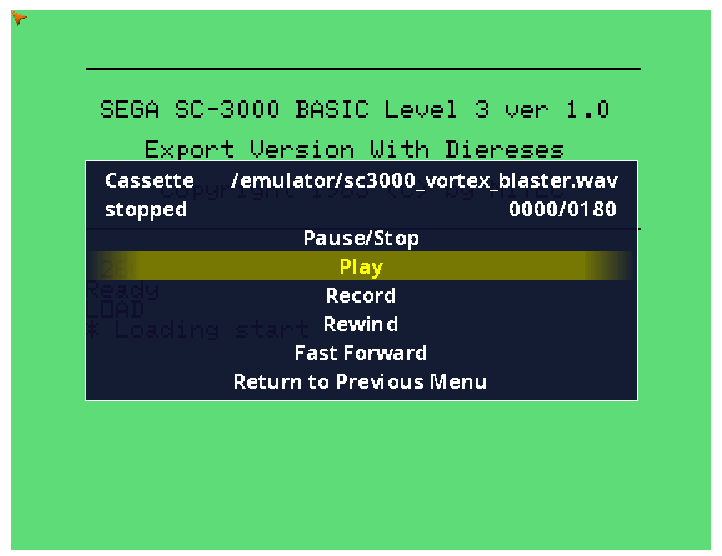
Press the TAB key to bring up the MAME menu (this requires the "-ui_active" flag set in Emularity). Navigate to "Tape Control" and select "Play". You can press the TAB key again to turn the menu off and return to the emulated system interface.
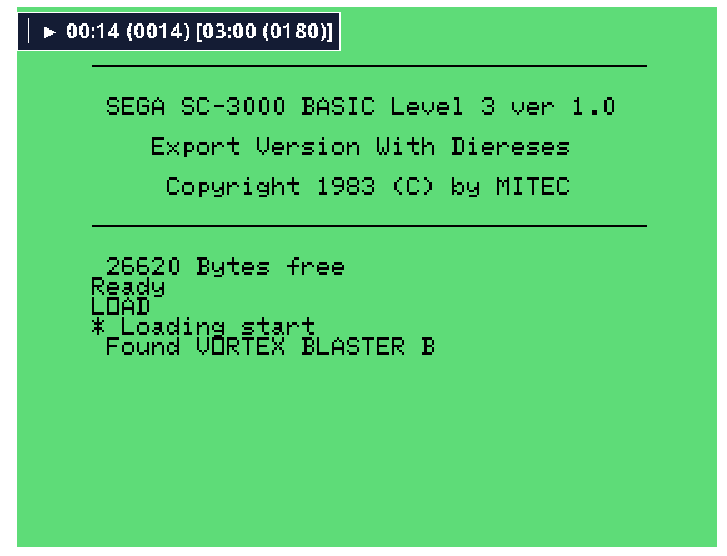
After a few seconds you'll see a message saying the system has found the game. Wait for the load to complete (a counter up the top left shows how many seconds have passed, as well as the total). This can take several minutes depending on the size of the game.
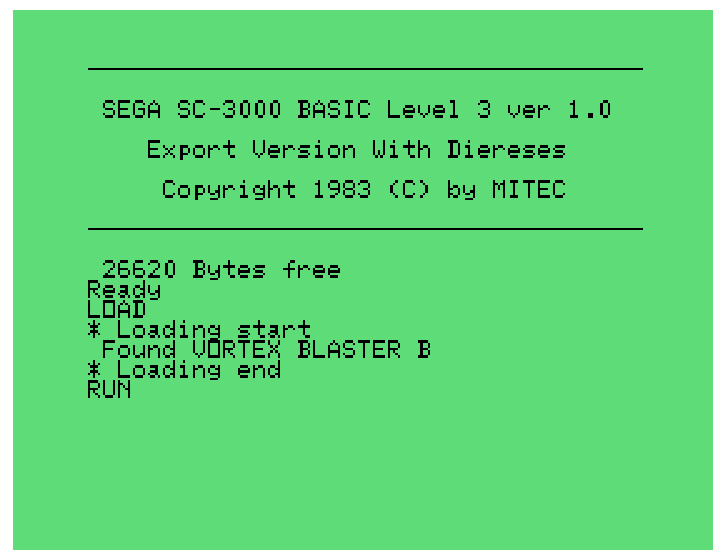
Eventually you will see a message saying * Loading End, and the tape counter will disappear when the virtual tape has reached the end of its playback.
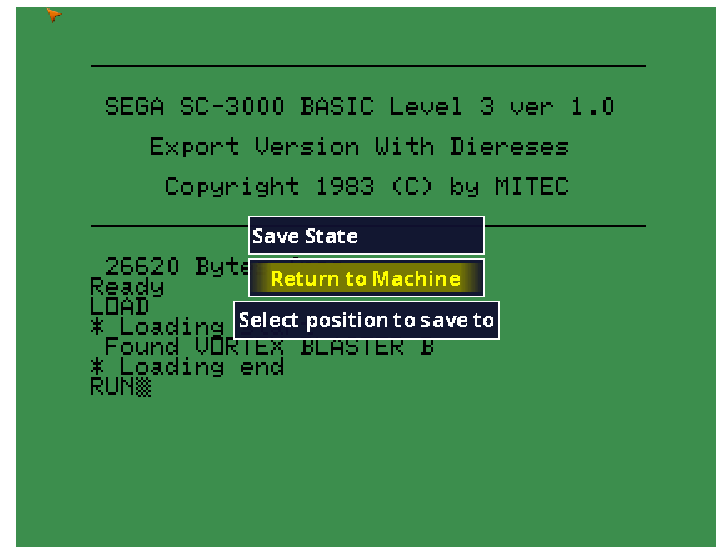
Type, but do not press enter, the command
RUN
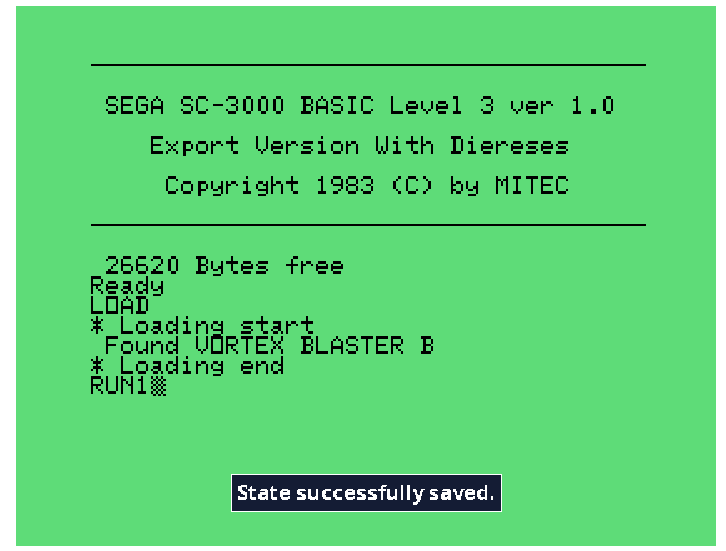
Now we're going to take a save state. This is a small file that contains the contents of the virtual system's memory state, which we can load in later to simplify and speed up the process on subsequent runs. Press Shift+F7 to open the dialogue to capture a save state, and then press 1 to save that to position. You'll see a message say that the save state was successful. You may also see that the 1 transfers through to the emulated system below, but don't worry, as your save state happened before that.
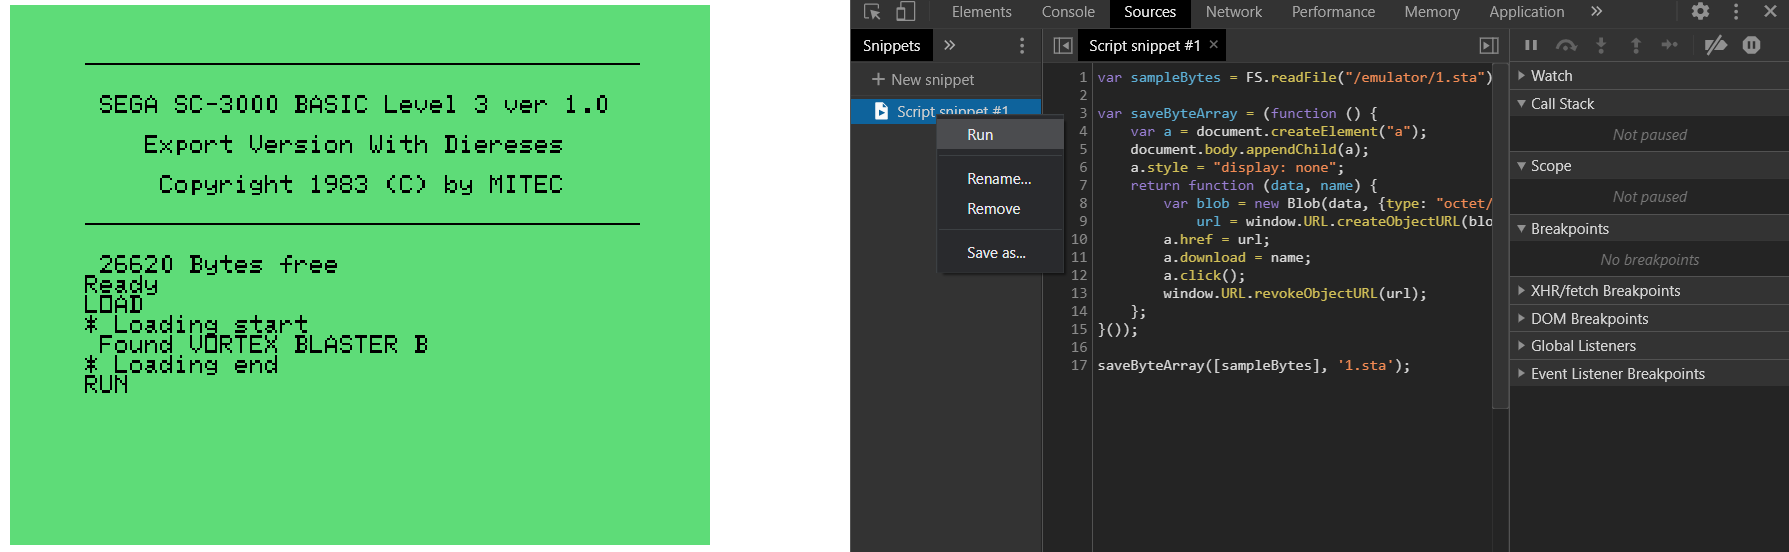
You'll need to click somewhere where keyboard input goes to the browser and not the emulated system. I found clicking in the URL bar to be effective. Then press F12 to bring up the Javascript developer tools.
Now choose the "Sources" tab (you may need to find it under the small double-arrows to the right), and click "New Snippet".
Paste in the following Javascript snippet
var sampleBytes = FS.readFile("/emulator/1.sta");
var saveByteArray = (function () {
    var a = document.createElement("a");
    document.body.appendChild(a);
    a.style = "display: none";
    return function (data, name) {
        var blob = new Blob(data, {type: "octet/stream"}),
            url = window.URL.createObjectURL(blob);
        a.href = url;
        a.download = name;
        a.click();
        window.URL.revokeObjectURL(url);
    };
}());
saveByteArray([sampleBytes], '1.sta');
This code finds the save state file (called 1.sta) and converts it into a format that allows the browser to download and save it. To execute, right-click on your code snippet name, and select Run. You'll be prompted to save the save state somewhere on your local system.
Once saved, upload the 1.sta save state file back to your binaries directory on your web server, ready to be injected into our emulator.
Final setup
Edit the html file created earlier. We'll remove the tape image load as it's no longer needed, and insert the save state. We'll also disable the UI, which will enable the virtual keyboard to pass through all keys, and not reserve MAME keys like TAB and the F keys. If you like, feel free to add extra text information in (it's helpful to provide some basic instructions / keys, and maybe a scan of the game's manual too).
<html>
  <head>
    <meta http-equiv="Content-Type" content="text/html; charset=utf-8">
    <title>Sega SC-3000 Vortex Blaster</title>
  </head>
    <canvas id="canvas" style="width: 50%; height: 50%; display: block; margin: 0 auto;"/>
    <script type="text/javascript" src="es6-promise.js"></script>
    <script type="text/javascript" src="browserfs.min.js"></script>
    <script type="text/javascript" src="loader.js"></script>
    <script type="text/javascript">
      var emulator = new Emulator(document.querySelector("#canvas"),
        null,
          // set the sc3000 driver in MAME
          new JSMESSLoader(JSMESSLoader.driver("sc3000"),
            // resolution is 2x
            JSMESSLoader.nativeResolution(560, 432),
            JSMESSLoader.scale(1),
            // our compiled MAME .js and .wasm files
            JSMESSLoader.emulatorJS("binaries/mamesc3000.js"),
            // MAME-provided sc3000 BIOS
            JSMESSLoader.mountFile("sc3000.zip",
              JSMESSLoader.fetchFile("Bios","binaries/sc3000.zip")),
            // Sega BASIC cartridge image
            JSMESSLoader.mountFile("Sega_BASIC_Level_3_V1_SC-3000.zip",
              JSMESSLoader.fetchFile("Game File","binaries/Sega_BASIC_Level_3_V1_SC-3000.zip")),
            // save state file
            JSMESSLoader.mountFile("1.sta",
              JSMESSLoader.fetchFile("Save State","save_states/vortex_blaster/1.sta")),
            // set the virtual cartridge
            JSMESSLoader.peripheral("cart","Sega_BASIC_Level_3_V1_SC-3000.zip"),
            // ensure the TAB key works for tape control and set save state locations
            // load time options, including save state
            JSMESSLoader.extraArgs(["-state_directory", "/emulator", "-statename", ".", "-state", "1"]),
            ))
      emulator.start({ waitAfterDownloading: true });
    </script>
  </body>
</html>
Point your browser to your web server once more, and load the emulator. This time on load you should see the message Save state successfully loaded, and our screen should show the various tape loading success messages from earlier, and have our RUN command waiting for us.
Press Enter, and the loaded game will run.